This page is part of Upgrading MemSQL. Start on that page.
This page describes one option for Upgrading MemSQL. Follow the instructions on that page for previous steps in the upgrade process.
This page describes how to upgrade MemSQL from an earlier version while keeping the cluster online and available. This option is only available for a cluster operating in High Availability. In this procedure, you upgrade individual nodes in the cluster while other nodes in the cluster are running to maintain cluster availability throughout the upgrade process.
Familiarize yourself with the entire procedure before beginning.
Ensure your cluster is running with High Availability (Redundancy Level 2). The redundancy_level variable should be 2.
memsql> show variables like 'redundancy_level';
+------------------+-------+
| Variable_name    | Value |
+------------------+-------+
| redundancy_level | 2     |
+------------------+-------+
Ensure your cluster is healthy, and in particular ensure that all nodes are online and there is both a primary and secondary for each partition. See EXPLAIN REBALANCE PARTITIONS. Otherwise, you will be unable to keep the cluster available throughout the upgrade procedure.
Avoid creating or dropping databases (CREATE DATABASE and DROP DATABASE) during the upgrade procedure.
Follow the upgrade sequence exactly as described in this section: leaf nodes first, then child aggregator nodes, and finally the master aggregator.
This procedure is NOT safe for upgrades from MemSQL 3.2 and earlier to MemSQL 4.0 and later. For that, see Upgrading MemSQL from 3.2 and earlier.
Part 1: Prepare for Upgrade
-
Retrieve the list of all databases by running
SHOW DATABASES, excluding system databases (memsql, sharding, information_schema). These system databases are also excluded in all following instructions. -
(Optional) Prior to upgrading, you may run SNAPSHOT DATABASE on any or all databases, which compacts the transaction logs, reducing database recovery time on startup.
memsql> SNAPSHOT DATABASE database -
Enable manual control in MemSQL Ops: In the web interface, go to Settings > Manual Cluster Control and check “Enable Manual Control”. Or with the command line interface:
$ memsql-ops cluster-manual-control --enable -
On the master aggregator, disable auto-attach and leaf failure detection:
memsql> SET GLOBAL auto_attach = OFF; memsql> SET GLOBAL leaf_failure_detection = OFF; -
On all aggregators, disable aggregator failure detection:
memsql> SET GLOBAL aggregator_failure_detection = OFF;
Part 2: Upgrade Leaf Nodes
Determine which availability groups each of your leaves are in with SHOW LEAVES.
To keep the cluster online, at least one leaf in each leaf pair must be online at any given time, so you will upgrade the two nodes in a leaf pair one after the other. Upgrading nodes in different leaf pairs may be done in parallel.
The simplest and generally fastest procedure to achieve this is to upgrade all the leaves in one availability group, then the other availability group. You may upgrade all the nodes in an availability group in parallel - it is generally fastest to upgrade them all at once, but you can also upgrade one or a few at a time.
-
Upgrade all leaf nodes in availability group 1 by following the instructions below in “Upgrading a leaf node” for each leaf node.
-
Run
RESTORE REDUNDANCYon every databasememsql> RESTORE REDUNDANCY ON database -
Upgrade all leaf nodes in availability group 2 following the same procedure.
-
Run
REBALANCE PARTITIONSon every databasememsql> REBALANCE PARTITIONS ON database
You can also upgrade leaf nodes in a different order - you do not have to upgrade all nodes in one availability group before the other - as long as you ensure at least one leaf node in each pair is online at all times. You may split all leaf nodes into multiple groups of leaf nodes, and upgrade group 1, then group 2, and so on, as long as the two leaves in each leaf pair are in different groups. Run RESTORE REDUNDANCY on every database in between each group of upgrades, and run REBALANCE PARTITIONS on every database at the end.
Upgrading a leaf node
To upgrade each leaf node:
-
If upgrading from version 4.1 or earlier (this step is not necessary for upgrades from versions 5.0 and later): Check if any master partitions on the leaf are far ahead of their replicas. See SHOW REPLICATION STATUS. If yes, wait for thereplicas to catch up. Note in particular that this means between upgrading the first leaf in a pair (A) and the second (B), you must wait for A, the newly upgraded leaf (which is currently a replica) to catch up replicating from B, its replication master which we are about to upgrade, on any newly written data while it was offline.
-
Run
DETACH LEAFfrom the Master Aggregator to detach the leaf from the cluster.memsql> DETACH LEAF 'host'[:port]; -
Upgrade the MemSQL leaf node according to the instructions in the Upgrading a Node section, including starting the node and waiting for it to recover.
-
Re-attach the leaf back to the cluster by running
ATTACH LEAF ... NO REBALANCEfrom the Master Aggregator.memsql> ATTACH LEAF 'host'[:port] NO REBALANCE; -
Wait for the attach to complete and the leaf to move to the online status.
InfoNote that it may take some time for the leaf to recover after upgrade, and the leaf won’t be attached until fully recovered. All leaf nodes must be attached before proceeding with the upgrade procedure, i.e. the next
RESTORE REDUNDANCYorREBALANCE PARTITIONScommand.
Example
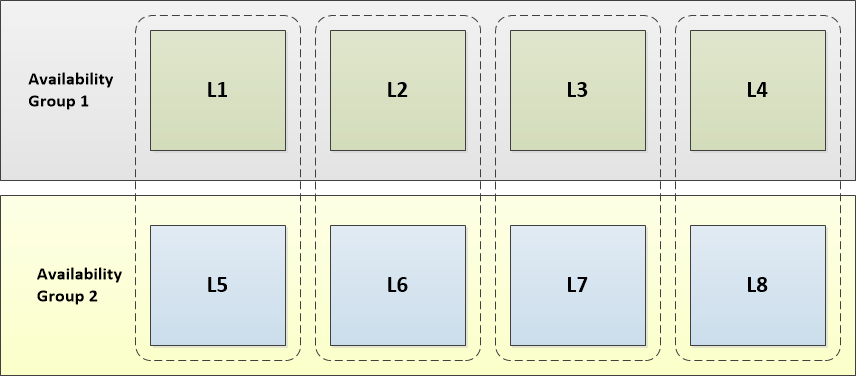
For example: assume we have the following cluster configuration, with 8 leaf nodes in redundancy 2:
There are two availability groups:
- Leaves L1 - L4 are in Availability Group 1
- Leaves L5 - L8 are in Availability Group 2
There are four pairs of leaf nodes:
- L1 and L5
- L2 and L6
- L3 and L7
- L4 and L8
To upgrade these leaf nodes:
- Upgrade Availability Group 1: leaf nodes L1, L2, L3, and L4
- Detach leaf nodes L1, L2, L3, and L4
- Upgrade and start leaf nodes L1, L2, L3, and L4 according to the instructions in the Upgrading a Node section
- Attach leaf nodes L1, L2, L3, and L4
- Run
RESTORE REDUNDANCYon every database - Upgrade Availability Group 2: leaf nodes L5, L6, L7, and L8
- Detach leaf nodes L5, L6, L7, and L8
- Upgrade and start leaf nodes L5, L6, L7, and L8 according to the instructions in the Upgrading a Node section
- Attach leaf nodes L5, L6, L7, and L8
- Run
REBALANCE PARTITIONSon every database
Part 3: Upgrade Child Aggregator Nodes
Upgrade each child aggregator node according to the instructions in the Upgrading a Node section.
You may upgrade child aggregators in parallel as desired. Keep enough aggregators online at any given time to continue running client queries smoothly.
When upgrading a child aggregator, you will be unable to run queries against that node. Furthermore, it will not see any operations take affect until it is upgraded, so to minimize risks, avoid running DDL operations such as ALTER TABLE while upgrading any of your aggregators.
Part 4: Upgrade the Master Aggregator Node
Upgrade the master aggregator node according to the instructions in the Upgrading a Node section.
When upgrading the master aggregator, you will be unable to run queries against that node. This means you will be unable to run DDL operations, DML operations against reference tables, as well as database-level and cluster-level operations.
Part 5: Re-enable Auto Cluster Operations
Restore the auto-cluster operations settings to their initial state.
-
On the master aggregator, re-enable auto-attach and leaf failure detection:
memsql> SET GLOBAL auto_attach = ON; memsql> SET GLOBAL leaf_failure_detection = ON; -
On all aggregators, re-enable aggregator failure detection:
memsql> SET GLOBAL aggregator_failure_detection = ON; -
Disable manual control in MemSQL Ops: In the web interface, go to Settings > Manual Cluster Control and uncheck “Enable Manual Control”. Or with the command line interface:
$ memsql-ops cluster-manual-control --disableThis completes the upgrade procedure.
Upgrading a Node
Follow these instructions to upgrade an individual node within the above procedure.
-
Stop the MemSQL node:
$ memsql-ops memsql-stop [memsql_id] -
Unmonitor the node in MemSQL Ops:
$ memsql-ops memsql-unmonitor [memsql_id]WarningBe careful not to remove the leaf. Do not use the –remove-leaf option for memsql-ops memsql-unmonitor, and if prompted about whether you want to remove the leaf, answer no. Do not run memsql-ops memsql-delete.
-
Move the entire MemSQL installation directory elsewhere. This is usually located at a path like
/var/lib/memsql/leaf-3306/. For example:old_memsql_dir='memsql.old' # any path where you want to move these files temporarily sudo -u memsql mv "$(memsql-ops memsql-path [memsql_id]) "$old_memsql_dir"You should also make a backup copy of the
datadirectory. -
Deploy the new version of MemSQL with MemSQL Ops. Specify the agent and port appropriately as needed.
$ memsql-ops memsql-deploy --role <leaf|master|aggregator>After this is finished a new MemSQL instance will be installed, by default located at a path like
/var/lib/memsql/leaf-3306/. It will not be started automatically because manual control is on. Leave it stopped. -
Move the
data/directory from the old MemSQL installation into the new MemSQL installation, but preserve the newdata/memsql_idfile. Also copy the filesmemsql.cnfandlib/licensefrom the old MemSQL installation into the new MemSQL installation. Make sure all files are owned by the memsql user. For example:new_memsql_dir="$(memsql-ops memsql-path [memsql_id])" # Move the data dir in sudo -u memsql cp "$new_memsql_dir/data/memsql_id" "$old_memsql_dir/data/memsql_id" # Keep the new memsql_id sudo -u memsql mv "$new_memsql_dir/data" "$new_memsql_dir/data.newemptyinstall.bak" sudo -u memsql mv "$old_memsql_dir/data" "$new_memsql_dir/" # Copy the configuration and license files in sudo -u memsql cp "$old_memsql_dir/memsql.cnf" "$new_memsql_dir/" sudo -u memsql cp "$old_memsql_dir/lib/license" "$new_memsql_dir/lib/license" -
Start the new MemSQL instance
$ memsql-ops memsql-start [memsql_id]If the root user on the node has a password: This is expected to start the node but produce an access denied error like:
Failed to connect to MemSQL node ID: ProcessHandshakeResponsePacket() failed. Sending back 1045: Access denied for user 'root'@'HOST' (using password: NO) -
If the root user on the node has a password: Unmonitor and re-monitor the node to configure the root password in Ops:
memsql-ops memsql-unmonitor ID memsql-ops memsql-monitor -u USER -p PASSWORD -h IP -P PORT -
Wait for the new MemSQL instance to recover. You can check whether it is recovering by running
show databases extendedand seeing if any row has State = ‘recovering’. -
Verify that the node is online. If everything goes well, clean up the old files
$ sudo -u memsql rm -rf "$old_memsql_dir"
$ sudo -u memsql rm -rf "$new_memsql_dir/data.newemptyinstall.bak"

